In today’s digital world, image optimization is essential for ensuring fast website load times, smooth sharing across platforms, and effective space management. Whether you’re designing content for your blog, social media, or a personal project, you’ve likely encountered the challenge of handling large image files. Canva, a widely-used graphic design platform, offers a simple yet effective way to compress images without sacrificing quality. In this guide, we’ll explore how to compress images using Canva, why it’s important, and a few tips to ensure you’re getting the best results.
Why Image Compression Matters
Before diving into the step-by-step process, it’s essential to understand why compressing images is so important. Large image files can slow down your website or digital project, affecting user experience and potentially lowering your search engine rankings. With websites or blogs, slow-loading images can cause visitors to bounce, leading to a loss in traffic and potential revenue. Compressing your images reduces their file size, making them easier to load and share without a noticeable reduction in quality.
Getting Started with Canva

Canva is known for its user-friendly interface, which makes it accessible for everyone, from beginners to advanced designers. One of Canva’s powerful features is its ability to optimize images quickly. If you’re unfamiliar with Canva, the platform offers a variety of templates, tools, and settings to help you create and modify images for different purposes.
How to Compress Images Using Canva
Step 1: Upload or Create Your Design
Once you are logged into Canva, the first step is to either upload the image you want to compress or create a new design. To upload an image, simply click the “Upload” button on the left-hand side of the screen. You can choose images from your computer or connect your account to services like Google Drive or Dropbox. If you’re creating a new design, Canva offers a wide range of preset dimensions for everything from social media posts to presentations. Select the dimensions that suit your project.
Step 2: Edit the Image
Before compressing the image, you may want to make adjustments to improve its overall look. Canva provides a range of editing tools that allow you to crop, resize, and apply filters to your images. If your goal is to maintain the highest image quality while compressing, you may consider removing unnecessary elements or simplifying the design. The fewer elements in the design, the smaller the file size will be.
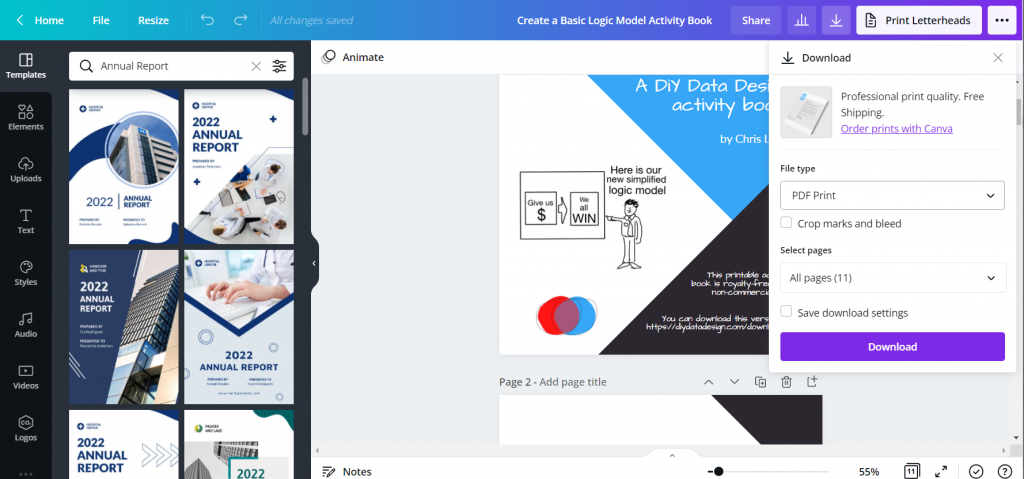
Step 3: Download and Select File Type

Once your image is ready for compression, the next step is to download it. Canva gives you the option to choose from several file types, including PNG, JPG, and PDF. Each file type has different benefits depending on the purpose of the image. For example, PNG files offer higher quality but are typically larger, while JPG files are more compressed but may lose a bit of detail.
Step 4: Download and Review the Compressed Image
Once you’ve adjusted the settings, click “Download.” Canva will automatically compress your image based on the quality level you’ve chosen. After the download is complete, review your image by opening the file and checking its quality. If it looks too pixelated or blurry, consider re-uploading the file to Canva and adjusting the quality slider to a higher setting.
If you’re satisfied with the result, your compressed image is ready to be used in your project. Whether it’s for a website, email, or social media post, the smaller file size should make it easier to upload and share without causing delays.
Additional Tips for Compressing Images in Canva
Consider File Format for Best Results
While JPG files are typically the best option for compressing images without sacrificing too much quality, you may find other formats like PNG useful, depending on the nature of your project. PNG files work best for images with transparent backgrounds or when you need to retain maximum image detail, such as logos or infographics. If you must use PNG, try keeping the image’s complexity low to minimize the file size.
Resize Before Compressing
One of the easiest ways to reduce an image’s file size is to resize it. Canva allows you to adjust the dimensions of your design under the “Resize” tab. If you’re working with a large image that doesn’t need to be displayed at full resolution, scaling it down can drastically reduce its file size without compromising its visual appeal. Keep in mind that resizing should be done before you compress the image to achieve the best results.
Experiment with Image Quality Settings
Don’t be afraid to experiment with Canva’s quality settings. Sometimes, reducing the quality from 100% to 80% is enough to see a significant file size reduction without any noticeable drop in visual quality. If you’re working with images that will be viewed on smaller screens, such as mobile devices, you can often compress the image even further without affecting the viewing experience.
Conclusion
Compressing images is a critical step in ensuring your digital content remains accessible, efficient, and professional. Canva provides a simple yet powerful toolset for reducing image file sizes while maintaining high quality. By following the steps outlined in this guide, you can easily shrink your files and improve the performance of your projects, whether they’re for a website, social media, or personal use.

lqsdzsjgxkrtgtvuvyhvetphrreyrm
Image optimization is crucial for maintaining fast website performance and enhancing user experience. Canva provides an efficient solution for compressing images without compromising their quality. By reducing file sizes, you can ensure quicker load times and better SEO rankings. This guide offers valuable insights into using Canva for image compression. Have you tried using Canva for optimizing your images, and what were the results? Given the growing economic instability due to the events in the Middle East, many businesses are looking for guaranteed fast and secure payment solutions. Recently, I came across LiberSave (LS) — they promise instant bank transfers with no chargebacks or card verification. It says integration takes 5 minutes and is already being tested in Israel and the UAE. Has anyone actually checked how this works in crisis conditions?
Image optimization is crucial in today’s digital age, and Canva makes it incredibly easy to compress images without losing quality. This guide provides a clear step-by-step process for anyone looking to improve their website or project’s performance. By reducing file sizes, you can enhance user experience and avoid potential traffic loss. Canva’s user-friendly interface ensures that even beginners can navigate the process effortlessly. How does Canva’s compression feature compare to other tools in terms of maintaining image quality? German news in Russian (новости Германии)— quirky, bold, and hypnotically captivating. Like a telegram from a parallel Europe. Care to take a peek?